
Table of Contents
Table of Contents
Introduction: Why a DIY Cold Frame is the Gardener’s Secret Weapon
When the first frost hits, most gardeners reluctantly say goodbye to fresh greens and tender vegetables. But with a DIY cold frame or a simple row cover, you don’t have to pack up your tools just yet. These low-cost, easy-to-build structures act like mini greenhouses, protecting your crops from frost and extending your harvest well into late fall—and sometimes even winter.
In this guide, you’ll learn three practical, budget-friendly plans for building your own cold frames and row covers. Whether you’re a beginner gardener or a seasoned grower, these projects will help you stretch your growing season without breaking the bank.
What makes a DIY cold frame especially exciting is that it empowers you to take control of your garden’s rhythm. Instead of surrendering to the calendar, you create a microclimate that bends the rules of the season. Imagine harvesting crisp lettuce in November or pulling fresh carrots from the soil when your neighbors are already buying produce at the market. That sense of independence is one of the greatest rewards of season extension.
For more expert insights on season extension, see this guide from The Old Farmer’s Almanac on building cold frames.
Another reason to embrace a DIY cold frame is the creativity it invites. No two cold frames look exactly alike—some are rustic and cobbled together from salvaged wood, while others are sleek, modern builds with polycarbonate panels. This flexibility means you can design a structure that fits your garden’s personality, your budget, and your long-term goals. By the end of this guide, you’ll not only know how to build one—you’ll also see how it can transform the way you think about gardening.
🌱 What Is a DIY Cold Frame?
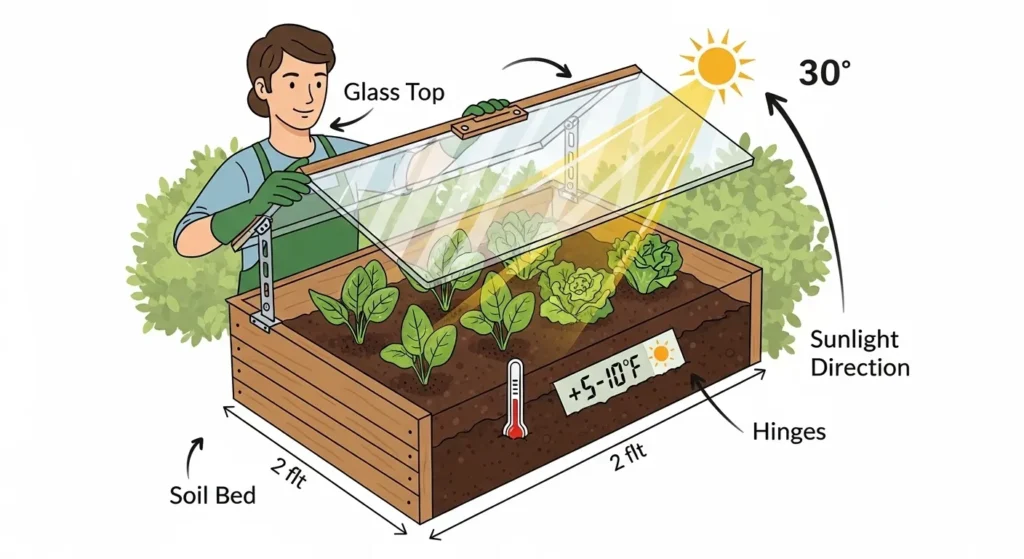
A DIY cold frame is essentially a small, enclosed structure with a transparent lid that captures sunlight and traps heat. Think of it as a miniature greenhouse that sits directly on the soil. Cold frames are perfect for:
- Starting seedlings earlier in the spring
- Protecting fall crops from frost
- Hardening off transplants before moving them outdoors
A well-built DIY cold frame doesn’t just extend your season—it also teaches you how microclimates work in your own backyard. By experimenting with placement, angle, and materials, you’ll notice how even a few degrees of warmth can mean the difference between thriving spinach and frost-burned leaves. Many gardeners are surprised to discover that a simple cold frame can keep soil temperatures 5–10°F warmer than the outside air, which is often enough to carry crops through unexpected cold snaps.
Another twist worth noting is that a DIY cold frame can double as a propagation chamber. If you’re the type who enjoys saving seeds or experimenting with cuttings, the stable, slightly warmer environment inside a cold frame is ideal for coaxing new life from old plants. This dual purpose makes it more than just a seasonal tool—it becomes a year-round asset in your gardening toolkit.
👉 Pair this with our plants to plant in winter guide to maximize what you can grow even in the coldest months.
Learn more about how cold frames work in this detailed article on winter gardening with row covers and cold frames.
Benefits of a DIY Cold Frame
- Low cost: Build one from recycled windows, scrap wood, or even old shower doors.
- Energy-free: No electricity required—sunlight does the work.
- Versatile: Grow leafy greens, herbs, and root crops longer into the season.
A well-built cold frame doesn’t just save money and extend your harvest—it also teaches you to read your garden in new ways. For example, you’ll notice how quickly the soil warms on sunny days, or how condensation forms on the glass lid, hinting at the microclimate you’ve created. Many gardeners are surprised to find that crops like radishes and arugula thrive even when the outside world feels inhospitable. And here’s the twist: once you’ve mastered the basics, you can experiment with adding thermal mass (like bricks or water jugs) to push your cold frame’s performance even further, almost like having a miniature greenhouse without the hefty price tag.
🏡 Cold Frame vs Row Cover: Which One Should You Choose?
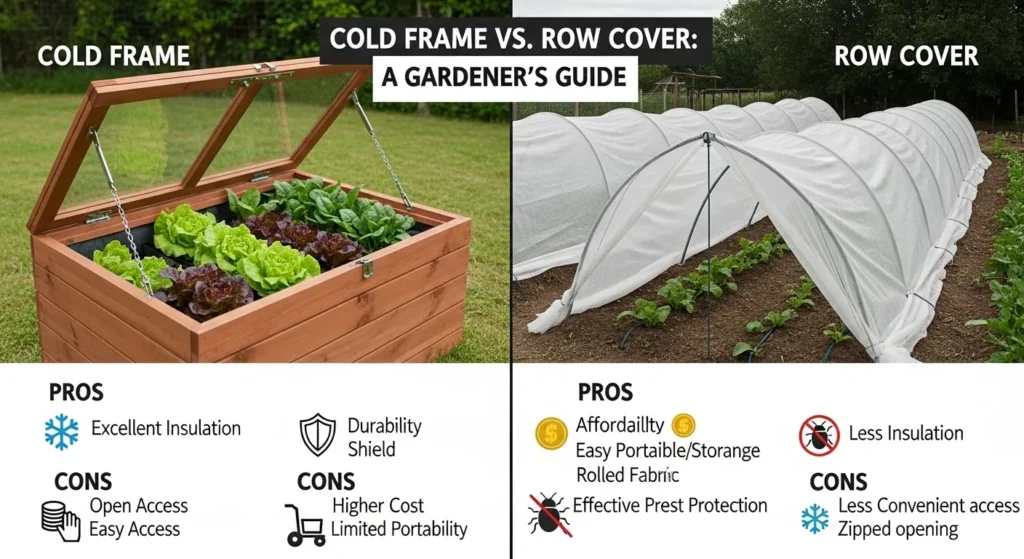
Gardeners often wonder whether to invest time in a DIY cold frame or stick with a row cover. Both have advantages, and the best choice depends on your crops, climate, and budget.
Cold Frame Advantages
- More durable and long-lasting
- Provides better insulation
- Ideal for overwintering hardy greens
Row Cover Advantages
- Lightweight and portable
- Covers larger areas quickly
- Cheaper and easier to set up
The real twist in the cold frame vs row cover debate is that you don’t actually have to choose one over the other. Many experienced gardeners layer their protection strategies—using a DIY cold frame for delicate greens while draping row covers over larger beds. This combination creates a tiered defense system, ensuring that even if one method fails during an unexpected freeze, the other provides backup.
Another overlooked advantage of pairing a DIY cold frame with row covers is pest control. While row covers keep out insects like cabbage moths, the cold frame provides a sturdier barrier against rodents and neighborhood cats that might otherwise dig into your beds. By thinking of these tools as complementary rather than competitive, you unlock a more resilient gardening system.
👉 For compact plots, see our space-saving raised beds for small gardens that work beautifully with cold frames and row covers.
👉 For practical advice on combining these methods, check out ECOgardener’s guide to using cold frames and row covers on raised beds.
Plan 1: Recycled Window DIY Cold Frame
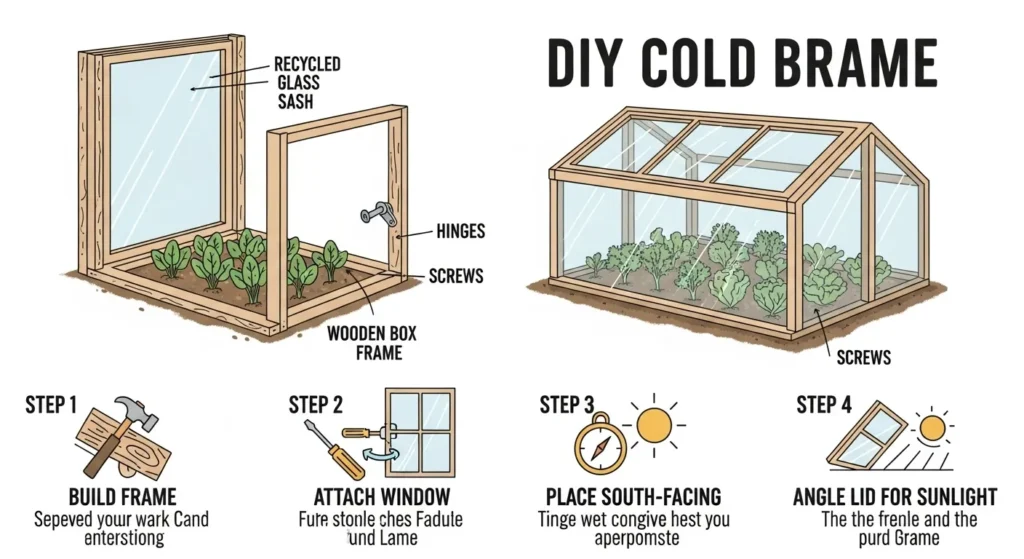
One of the most popular budget cold frame ideas is to repurpose an old window or glass door.
Materials Needed
- Old window sash or glass door
- Scrap wood for the frame
- Hinges and screws
- Drill and saw
Step-by-Step Instructions
- Build a simple wooden box to fit the window dimensions.
- Attach the window with hinges so it can open for ventilation.
- Place the cold frame in a sunny, south-facing spot.
- Angle the lid slightly to maximize sunlight exposure.
Best Crops for This Cold Frame
- Spinach
- Kale
- Lettuce
- Radishes
One of the joys of building a DIY cold frame from recycled windows is the character it adds to your garden. Each salvaged piece tells a story—an old farmhouse window, a discarded patio door—and transforms into a functional piece of garden architecture. This not only saves money but also gives your garden a rustic, authentic charm that store-bought kits can’t replicate.
For an extra twist, consider painting the wooden frame with weather-resistant colors that match your garden’s theme. A bright green or earthy brown frame can make your DIY cold frame feel like a natural extension of your landscape, while also protecting the wood from rot. Small design touches like this elevate the project from purely practical to something that sparks curiosity and admiration from visitors.
👉 To enrich the soil inside your cold frame, learn how to make leaf mold fast for a nutrient-rich growing medium.
🏗️ Plan 2: PVC Hoop Row Cover
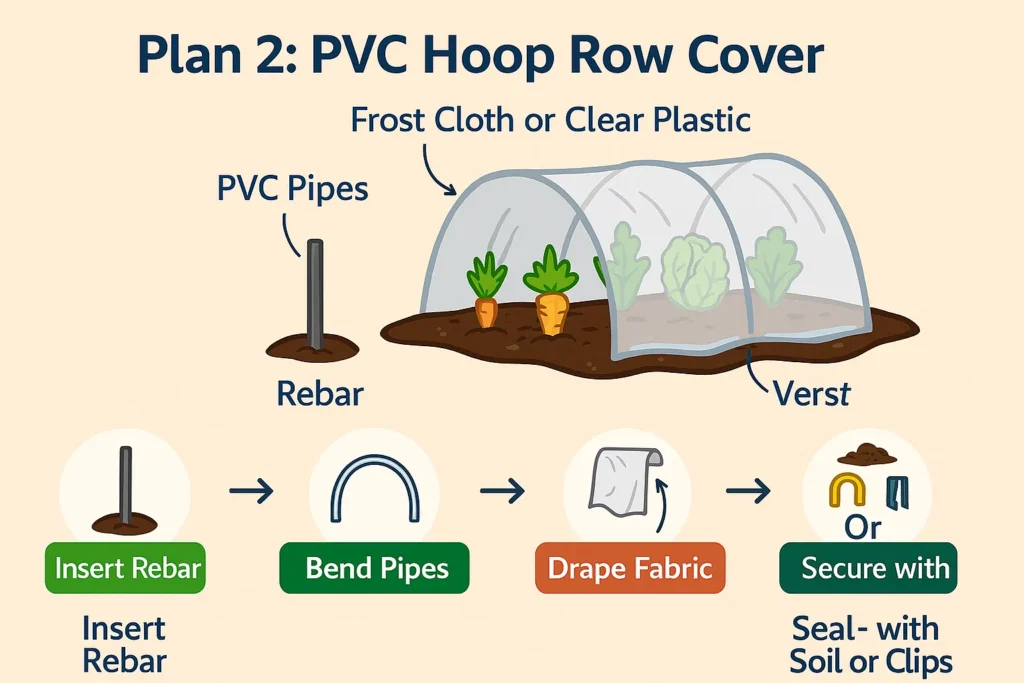
If you want a quick, flexible solution, a row cover DIY project using PVC hoops is perfect.
Materials Needed
- PVC pipes (½ inch)
- Rebar or garden stakes
- Frost cloth or clear plastic sheeting
- Clips or clamps
Step-by-Step Instructions
- Insert rebar into the soil at intervals.
- Bend PVC pipes into arches and slide them over the rebar.
- Drape frost cloth or plastic over the hoops.
- Secure edges with soil, bricks, or clips.
Best Crops for This Row Cover
- Carrots
- Beets
- Lettuce
- Spinach
What makes a row cover DIY project so appealing is its adaptability. You can scale it up for a large bed of carrots or scale it down for a single row of lettuce. Unlike a fixed DIY cold frame, PVC hoops can be moved around the garden as your planting schedule changes, giving you flexibility throughout the season.
Here’s a twist: some gardeners use their PVC hoop structures as summer shade tunnels by swapping frost cloth for shade cloth. This means your DIY cold frame and row cover system isn’t just about cold weather—it can also protect tender crops from scorching summer sun. By rethinking how you use these structures, you get year-round value from a single, low-cost build.
👉 For more eco-friendly garden design, discover how rain chains add both beauty and sustainability to your outdoor space.
Plan 3: Low Tunnel with Plastic Sheeting
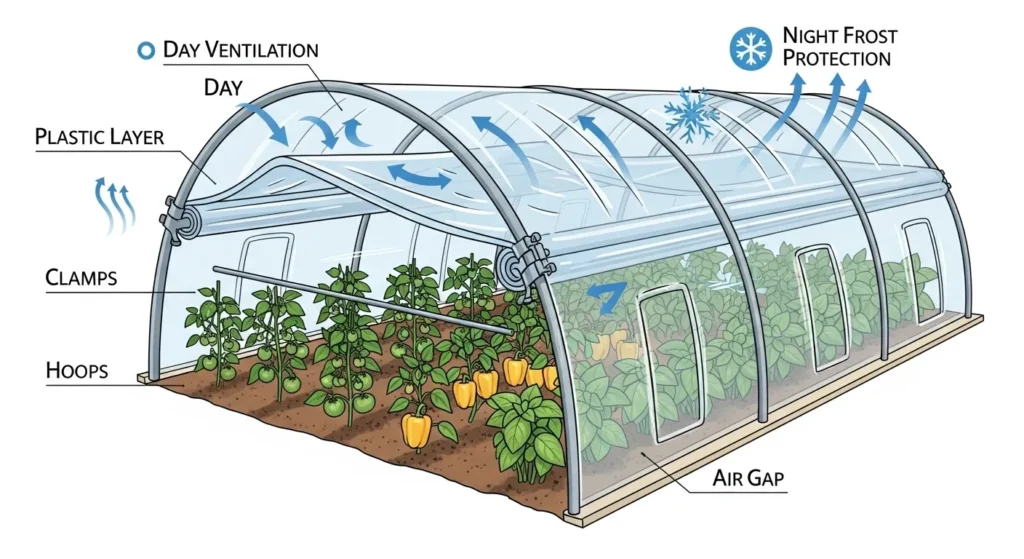
For gardeners who want to push the season even further, a low tunnel is a step up from a simple row cover.
Materials Needed
- Metal hoops or flexible conduit
- Heavy-duty clear plastic
- Clips or clamps
Step-by-Step Instructions
- Space hoops evenly across your garden bed.
- Stretch plastic tightly over the hoops.
- Secure with clamps or soil.
- Vent on sunny days to prevent overheating.
Best Crops for This Low Tunnel
- Tomatoes
- Peppers
- Cucumbers
- Basil
The beauty of a low tunnel is that it bridges the gap between a simple row cover and a full greenhouse. While a DIY cold frame is excellent for small beds, low tunnels allow you to protect entire rows of warm-season crops. This makes them especially valuable for gardeners who want to keep tomatoes or peppers producing well past their usual season.
For a twist, try experimenting with double-layer plastic sheeting. By leaving a small air gap between two layers, you create insulation similar to double-pane windows. This technique can boost the effectiveness of your low tunnel, making it perform almost like a professional greenhouse—at a fraction of the cost. It’s a clever hack that turns a basic DIY cold frame concept into something far more powerful.
👉 If you’re inspired by trends, check out why faded petal pink is the color to watch for future garden designs.
🌿 Tips for Success with a DIY Cold Frame
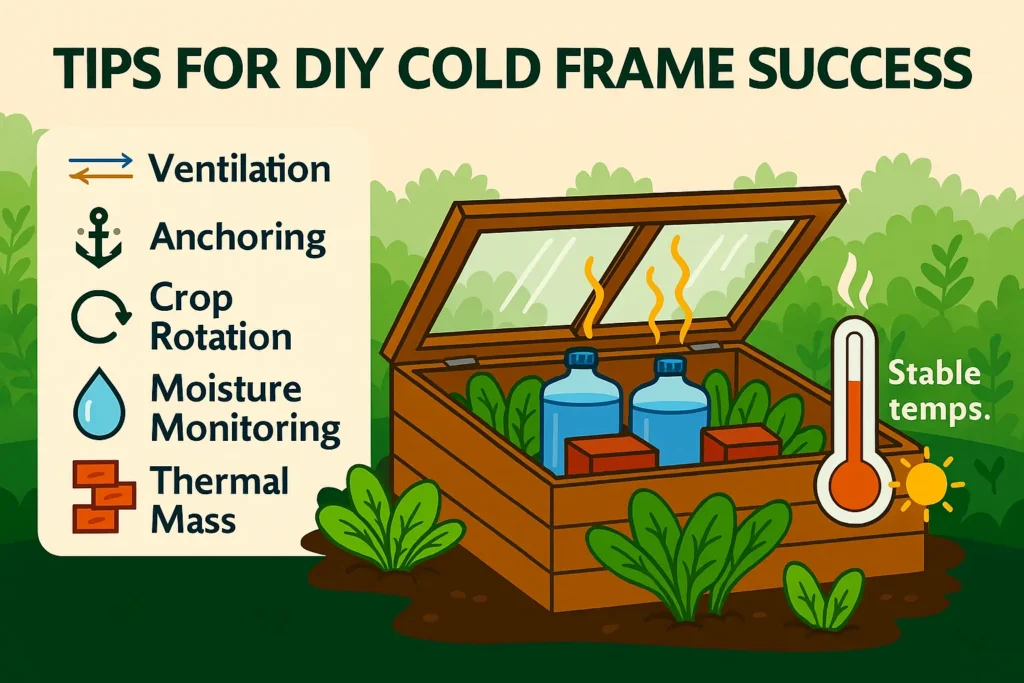
- Ventilation is key: Open lids or covers on sunny days to prevent overheating.
- Anchor against wind: Use bricks, sandbags, or soil to secure covers.
- Rotate crops: Avoid planting the same crop repeatedly to prevent soil depletion.
- Monitor moisture: Cold frames can dry out quickly—check soil regularly.
Another tip that seasoned gardeners swear by is using thermal mass inside your DIY cold frame. Placing a few dark-colored water jugs or bricks inside the frame allows them to absorb heat during the day and release it slowly at night, keeping temperatures more stable. This small adjustment can mean the difference between crops surviving or succumbing to a sudden frost.
And here’s a curiosity-sparking twist: some gardeners even integrate solar-powered fans or automatic vent openers into their DIY cold frame setups. While it may sound high-tech, these additions are surprisingly affordable and prevent overheating on sunny days. It’s a reminder that even the simplest garden structures can evolve into innovative, hybrid systems when you’re willing to experiment.
👉 For soil health tips, explore our container cover crops guide to keep your beds fertile year after year.
📊 Seasonal Timing: When to Use a DIY Cold Frame
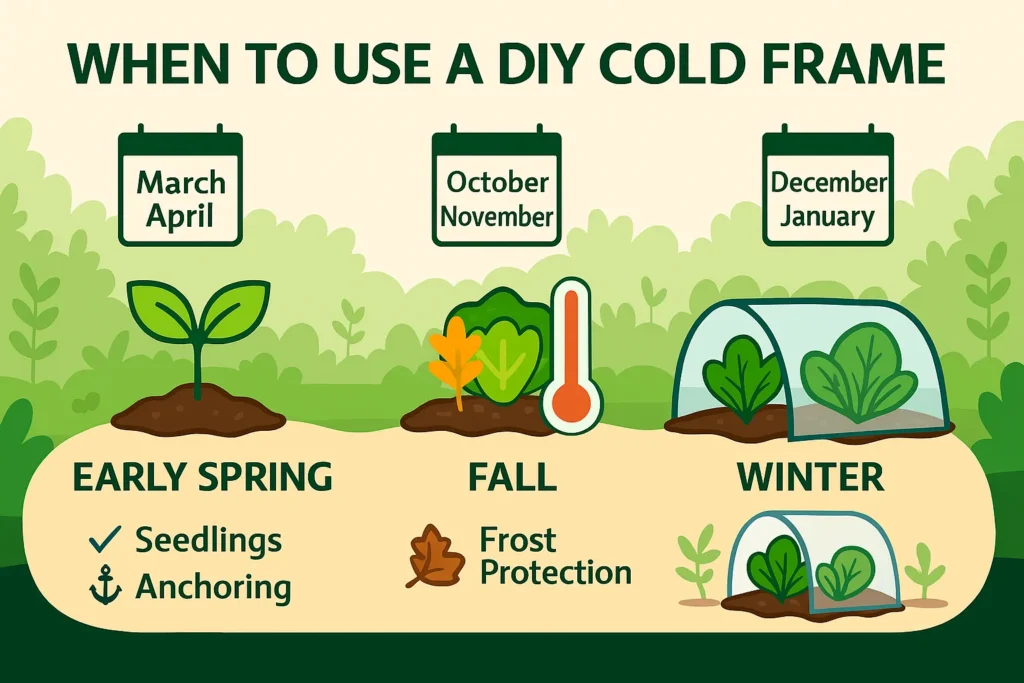
- Early Spring: Start seedlings 2–4 weeks earlier than usual.
- Fall: Protect crops from the first frost and extend harvest by 4–8 weeks.
- Winter (mild climates): Grow hardy greens like spinach and mache.
Timing is everything, and the cold frame rewards those who think a step ahead. In early spring, it becomes your secret weapon for hardening off seedlings without the shock of sudden outdoor exposure. By fall, it transforms into a shield, catching the last rays of warmth and holding them just long enough to keep lettuce crisp and carrots sweet. And in winter, especially in milder regions, it feels almost magical to lift the lid and find fresh spinach waiting when the garden outside lies dormant. The real curiosity lies in experimenting—some gardeners even tuck in herbs like parsley or cilantro to see how far they can stretch the season, discovering that the cold frame often outperforms expectations.
✅ Conclusion: Why Every Gardener Needs a DIY Cold Frame
A DIY cold frame is one of the most cost-effective tools you can add to your garden. With just a few recycled materials or inexpensive supplies, you can protect your crops, extend your harvest, and enjoy fresh produce long after your neighbors have packed up their gardens.
Whether you choose a recycled window cold frame, a PVC hoop row cover, or a low tunnel, each plan offers unique benefits. Start small, experiment, and discover how much longer you can keep your garden thriving.
The real beauty of a DIY cold frame is that it grows with you. At first, it may simply be a way to keep spinach alive through October. But as you gain confidence, you’ll find yourself experimenting with new crops, testing different coverings, and even combining cold frames with row covers for maximum protection. Each season becomes a chance to refine your approach, and each success builds momentum for the next.
And here’s the twist: a DIY cold frame doesn’t just extend your harvest—it extends your connection to the garden itself. While others retreat indoors for the winter, you’ll still be out there, lifting the lid, checking the soil, and savoring the quiet magic of plants that defy the frost. It’s not just about growing food; it’s about cultivating resilience, curiosity, and joy in every season.
👉 And if you’re looking to add beauty alongside resilience, don’t miss our unique yellow flowers that brighten gardens even in cooler months.
❓ Frequently Asked Questions About DIY Cold Frames & Row Covers
How long can a DIY cold frame extend the season?
A well‑built DIY cold frame can extend your harvest by 4–8 weeks in most climates. In milder regions, gardeners often keep hardy greens like spinach and kale alive all winter. The key is monitoring temperature and venting on sunny days to prevent overheating.
Do row covers block too much sunlight?
Lightweight row cover fabric allows 70–90% of sunlight to pass through, which is more than enough for most crops. When paired with a DIY cold frame, row covers add an extra layer of frost protection without starving plants of light.
Which is cheaper: a DIY cold frame or a row cover?
Row covers are generally the most budget‑friendly option, especially if you use PVC hoops and frost cloth. A DIY cold frame may cost slightly more upfront, but it’s sturdier, reusable for years, and often built from recycled materials—making it a smart long‑term investment.
What crops grow best in a DIY cold frame?
Cold frames excel at protecting cool‑season crops like lettuce, spinach, radishes, carrots, and herbs. They’re also excellent for hardening off seedlings in spring. If you want to push the limits, try overwintering kale or mache for fresh greens in the coldest months.
Do I need to vent my DIY cold frame in winter?
Yes. Even in winter, a sunny day can cause temperatures inside a DIY cold frame to rise dramatically. Propping the lid open or installing an automatic vent prevents overheating and keeps plants healthy.

")
")

4 Comments on “DIY Cold Frame & Row Cover Plans: 3 Low-Cost Ways to Extend Your Fall Harvest”